Navigation buttons are essential features of both web pages and application interfaces. In the following tutorial, we create an attractive navigation button in a few simple steps that can be followed even with limited Gimp knowledge.
The button you are going to create looks like this:
1) First, let's create a basic button shape with rounded corners. The Gimp sucks when it comes to creating rounded rectangles. The following two examples explain one way of creating them.
a) Open the Gimp and go to Preferences>Default Grid and set the Grid Spacing Width and Height to 10 pixels. Restart the Gimp.
b) Create a new document with a white background. Add a new layer. Go to View and check the Show Grid and Snap to Grid options.
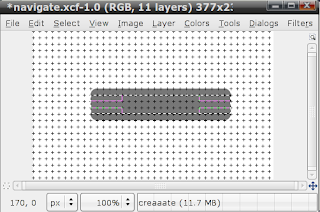
c) Using the Ellipse selection tool create four small circles like in the image below. Then with the Rectangle Select tool create a selection; look at the image. Fill the selections with medium gray.
d) And finally create another selection like the one below and fill it with the same gray. And here you have the rounded rectangle.
2) Now, that we have the basic button shape we duplicate the button shape layer two more times; name the layers as in the following image.
3) Fill the white layer with white, load its selection, go to Select>Shrink and shrink the selection about 2 pixels; inverse the selection and delete it. Do the same with the grad layer but here shrink the selection about 3 pixels. Then create a gradient similar to the subsequent image.
4) Next, we create an arrow, which for the sake of simplicity, will be a triangle; but if you want to create a more sophisticated shape go ahead and do it; here the arrow signifies action. Add a new layer to the stack and if they are not on, turn on the Show Grid and the Snap to Grid options; activate the pen tool by clicking on its icon in the toolbox and click on the grid points to create a triangle shape similar to the one on the image below. When you do the last click hold down the Ctrl key to close the path. When it is done, go to the Path dialog and at the bottom of the dialog box click on the Path to Selection button, this will make a selection out of the path. Fill the selection, this time with some color, mine is orange. If the triangle is too large scale it to fit over the button. After that, you can turn off the Grid and delete the path object.
5) Next, we create two vertical lines that sort of separating off the arrow from the rest of the button content. Add a new layer and with the Rectangle selection tool make a selection about 2 pixels wide. Fill the selection with medium gray; duplicate the layer and fill the duplicate with white; offset the white line about 2 pixels along the x-axis. Now you should have an image like the one below.
6) Finally, add white text to the button like I did; to enhance both the text and the arrow shape add drop shadow to them. That is all there is to it.
The final artwork.
Gimp Interface Magic
 11 Gimp projects: unique effects, easily adaptable solutions, time-saving techniques and practical applications. The projects are fully customizable presented in an easy to follow format that takes you on a step-by-step ride to rediscover your creativity.
 You can download a sample version of the book from here.
The full version of the book is available from Lulu.
You are here: Home > Gimp Tutorials > Gimp Tutorial: Creating a Navigation Button
Wednesday, July 18, 2007
Gimp Tutorial: Creating a Navigation Button
Labels: Gimp Tutorials
Subscribe to:
Post Comments (Atom)


2 comments:
One tip when writing GIMP tutorials: show the reader what you're going to make right at the beginning of the post. This attracts attention right away and will keep the user reading if e.g. he comes from a Google search or some tutorial index.
I really liked this post. I understand that this was way back in 2007 when this post was posted. In 2009 March, I use GIMP 2.6.2, and it has an option of "Rounded Corners" in the rectangle select tool. So, you really don't need to do much. Just select the rectangle tool, check the 'rounded corners' options. This will enable the radius field. Enter the radius and there we have, a rounded rectangle.
Post a Comment